| STEP 1: Utilizing the touch screen monitor at the Podium, select the system input by pressing the corresponding menu item. The selected item will be illuminated in green. | |
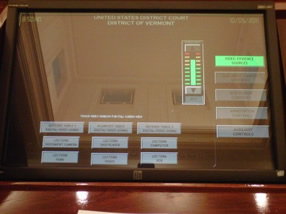 |
Video Evidence Sources Menu: Defense Table 1 Digital Video (HDMI) Plaintiff Table Digital Video (HDMI) Defense Table 2 Digital Video (HDMI) Lectern Document Camera Lectern DVD Player Lectern Computer (your own notebook) Lectern HDMI Lectern Video Lectern VCR |
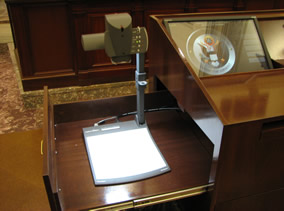 |
Select “Lectern Document Camera” on the touch screen.
The document camera will display any media placed on the display surface. Simply place any document or object face-up on the display surface. You will then see the object displayed on the podium monitor. The document camera has an overhead lamp that can be turned on or off manually. The lamp is ON by default. |
| Controls | Selections |
| Zoom Dial (On top of document camera | Zoom in or out |
| Document Camera Controls Menu: (touch screen) |
No Lamps, Light Box, Upper Lamps Focus Near, Far or Auto Image Mode or Text Mode Positive or Negative Mode Zoom In/Out Open, Close or Auto Iris View Live Image White Balance Power ON or OFF |
| Lectern Blu-Ray DVD Player Operation | |
 |
Select "Lectern DVD Player" on Touch Screen under “Video Evidence Sources” menu. DVD player is ON by default. |
| DVD Player Controls Menu: (touch screen) |
Top Menu, Disc Menu Repeat, Repeat A-B Return, Zoom Display, Mode Open/Close, Setup Track Play, Stop, Pause, Previous, Scan, Next Power ON or OFF |
| Lectern VHS/DVD Player Operation | |
 |
Select “Lectern VCR” from the “Video Evidence Sources” menu Press power button on front of VCR/DVD Player (or on remote) Select which source you want to use on the front of the player (DVD or VHS) Insert VHS tape or DVD Press play on VCR/DVD player (or on remote) |
|
This VCR/DVD player is designed to provide a clear still frame view. This allows the user to "freeze" the picture on one frame. This is accomplished by pressing the pause button on either the VCR or on the remote.
NOTE: The podium and witness touch screens can be used to super-impose mark-ups on a still frame view. The VCR/DVD player can remain running while the Video Source Selector is used to select an alternate video source. This may be useful in toggling between a VCR/DVD still frame shot and the document camera. The volume for the VCR/DVD player is controlled by the courtroom deputy. |
|
| PC Operation | |
 |
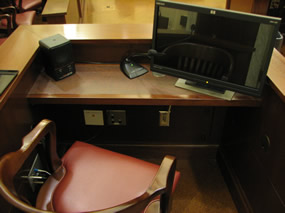
Select “Lectern Computer” from the “Video Evidence Sources” menu. Connect the end of the VGA cable to the external VGA port on the computer. All cables can be found in the “Cubby” to the right of the touch screen. Also connect the stereo audio cable to the headphone jack of your PC is sound is desired. The Lectern Computer option is designed for those users who want to While at the Lectern, users can also select: Defense Table 1, Plaintiff Table, or Defense Table 2 digital inputs, if they have computer video sources there. The Courtroom Deputy can override any input selections from the Lower Bench. |
|
Select PC from the Video Source Selector
Connect one end of a VGA cable to the external VGA port on the computer and the other end to the VGA port on the side of the Video Source Selector Boot the computer NOTE: We highly recommend using 1024 x 768 screen resolution on the computer. Consult your operating system manual for instructions on how to verify/select this setting |
|
| Step 3: | |
| Touch Screen Operation - Annotation | |
 |
First, touch the smaller video window at the top center of the screen (Picture in picture) to switch to Full Screen Annotation Mode.
To freehand draw: Press the flesh side of a finger on the monitor screen and draw it across the image until the drawing line or line segment is complete. Lift the finger off of the monitor to end drawing. This step may be repeated multiple times. To overlay a pointer: Quickly tap the touch screen once with your finger at the point where you would like a pointer to be placed. This step may be repeated multiple times. To erase: Briefly tap the monitor screen in the top right-side corner of the screen to erase the last mark made. Repeat this step to continue erasing previous marks sequentially. Briefly tap the touch screen in the bottom left-side corner to clear the entire screen. To change the color: To change the color of the line or pointer: Briefly tap your finger in the top left-side corner of the screen. To Exit Annotation Mode: Briefly tap the touch screen in the lower right-side corner. Further Annotation customization is available in the “Annotation Controls” menu. |
 |
There is also a touch screen monitor at the witness stand. This monitor has touch screen annotation capabilities identical to the podium monitor. Source selection and controls are not present. |